
Introduction
When working with real-world data especially in retail, logistics, or customer-facing industries, date And time data cleaning In Excel are some of the most importance data cleaning operations you must perform.
In this article, you will learn a complete guide to this type of cleaning.

Most date and time fields are often inconsistent, incomplete, or/and unreadable by Excel. These small errors can lead to big problems in dashboards, analytics, and reporting accuracy.
In this article, I will walk you through a practical data cleaning project using Excel.
You’ll learn how to:
- Fix messy date and time columns
- Handle inconsistent formats
- Remove unwanted time zone tags
- Convert text-based entries into usable date/time values.
To access other data cleaning techniques in Excel, please click here for text data cleaning in Excel and here for numerical data cleaning in Excel.
Whether you’re a beginner, a small business owner, or just getting started in data analytics, this guide will help you clean and structure your data so it’s ready for insights, automation, and visualization. To follow along, please download the dataset here
Why data cleaning Matters:
- Messy dates can break time-series analysis and sorting.
- Inconsistent formats cause Excel to treat values as text, not actual dates.
- Incorrect timestamps impact delivery tracking, sales forecasting, and customer reporting.
Common Cleaning Tasks:
- Standardization – Ensuring consistent formatting (e.g., all dates follow YYYY-MM-DD)
- Conversion – Turning text-based values into Excel-recognized date/time formats
- Validation – Ensuring delivery dates aren’t earlier than transaction dates
- Cleanup – Removing suffixes, time zone info, or irrelevant labels like “Yesterday”
Prerequisites
Before you begin, here’s what you’ll need:
Tools & Skills:
- Microsoft Excel (2016 or later recommended)
- Basic understanding of Excel formulas and formatting
- Familiarity with Excel’s menu, ribbon and groups tools like Text to Columns.
Now, let’s move on to see some of the most used used date functions in Excel
Key Excel Data Cleaning Date and Time Functions & Tools Used
| Excel Functions | What it is used for |
| DATEVALUE | Converts text-formatted dates into valid Excel date values |
| SUBSTITUTE | Removes unwanted parts of a string (e.g., “th”, “UTC”) |
| IF / IFERROR | Handles conditional logic and suppresses errors in formulas |
| TEXT | Reformats dates or times into readable formats (e.g., hh:mm:ss) |
| TIMEVALUE | Converts time strings into Excel time values |
| TEXTJOIN / MID / SEQUENCE | Used creatively to reverse or parse complex strings |
| Text to Columns (Tool) | Splits combined date/time fields into separate columns or formats inconsistent data |
Identification of Problem
Before you can clean any dataset, you need to understand what’s wrong with it. In this project, we worked with a retail transaction dataset that included multiple columns.
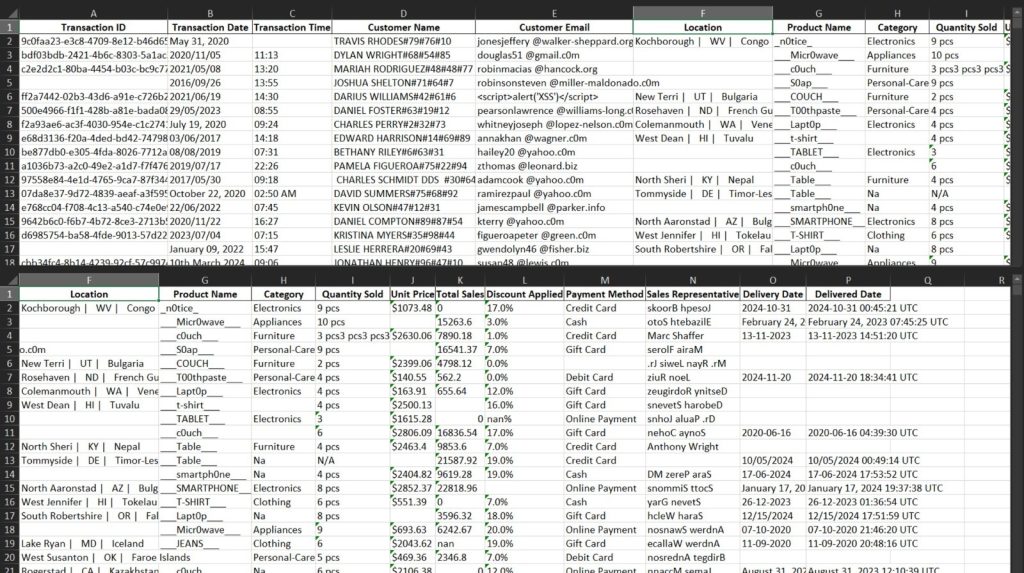
Mixed date and time formats in the dataset before cleaning
However, we would only be paying attention to the columns containing date and time. So first off, we start by duplicating the document, this helps us to have something to fall back to in case we encounter an error.

Dirty Date and Time Columns
At first glance, these columns looked like they contained valid values, after applying the filter tool on the data set, we discovered a mix of formatting issues, data types, and inconsistencies. Next, let’s take a look at some common problems we found.
Common Problems We Found:
- Transaction Date: Inconsistent formats like [May 31,2020], [2020/11/05] [2021-06-19],[10th March 2024] Inverted dates [41/60/0202] [2202 ,40 rebmetpeS], And text-based dates like “Yesterday”
- Transaction Time: Some time entries were blank, others used 24-hour format (13:20) and some were in 12-hour format with AM/PM
- Delivery Date: Mixed formats such as February 24, 2023, 2024-10-31, and 13-11-2023, which could confuse Excel
- Delivered Date-time: Full timestamp strings including time zones, e.g., February 24, 2023 07:45:25 UTC, which are not recognized by default in Excel
These inconsistencies made it difficult to:
👉 Filter or sort by date
👉 Calculate time differences
👉 Use the data in pivot tables or dashboards
To get this data ready for analysis, we needed to standardize all the date and time fields—making sure Excel could recognize and process them correctly.
Now that we have had a clearer understanding of the messy date fields in our dataset, let a detailed step by step breakdown of how to clean date data in Excel.
Step-by-Step Process of Cleaning Messy Date and Time Data in Excel
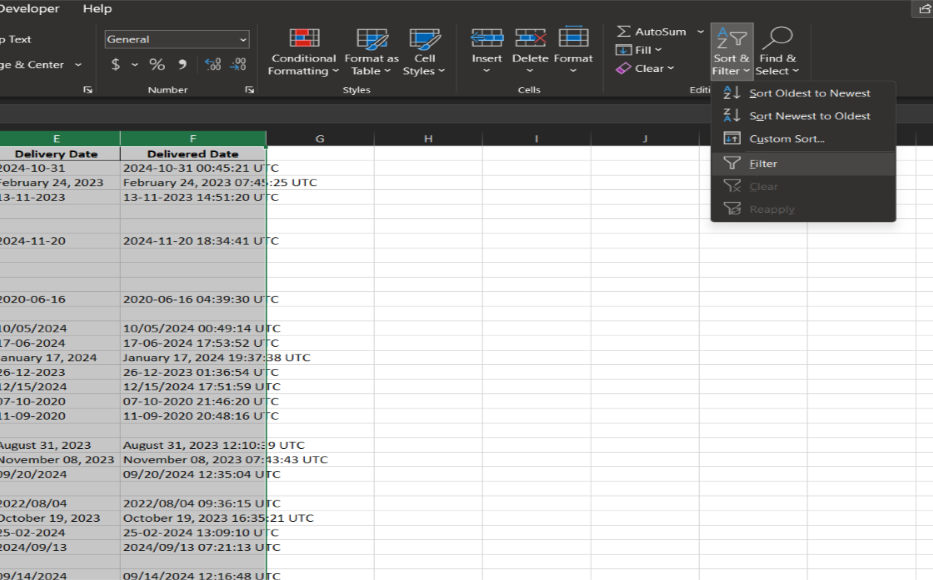
Step 1: Create a Working Copy and Apply Filters
Before making any changes, it is important to protect your original data.
- Duplicate the worksheet to create a backup version. This ensures you have a copy of the original dataset in case any mistakes are made during cleaning.
- Apply filters to all columns. This helps you quickly identify inconsistent formats, blanks, outliers, or anomalies that might need attention.
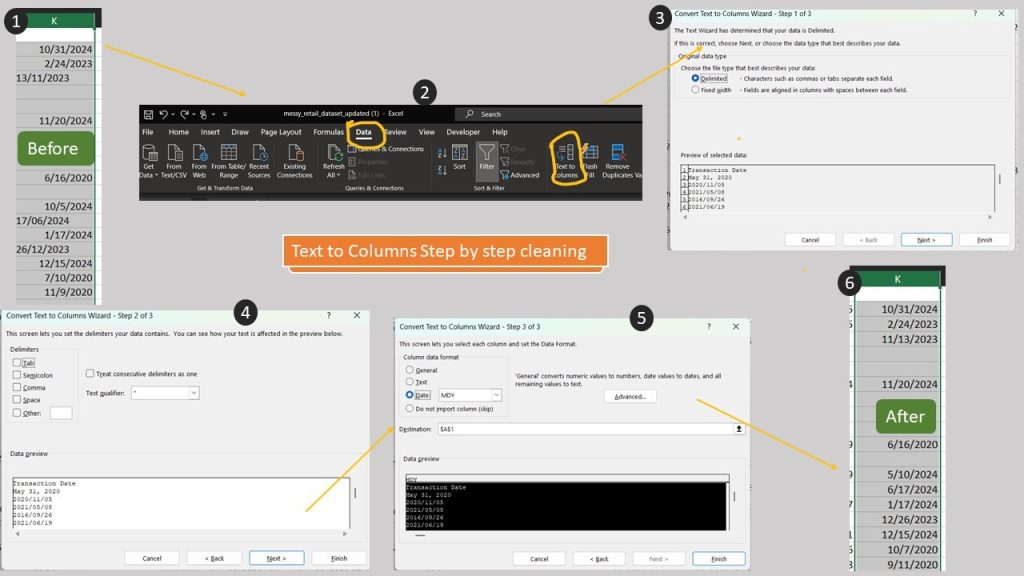
Step 2: Use Text to Columns to Standardize Recognizable Dates
The Transaction Date column contained a mixture of formats such as May 31, 2020, 2020/11/05, and 2021-06-19.
To standardize these:
- Select the Transaction Date column.
- Go to the Data tab > Text to Columns.
- Choose Delimited, click Next.
- Click Next again to skip delimiters.
- In Column Data Format, select Date and choose MDY.
- Click Finish.
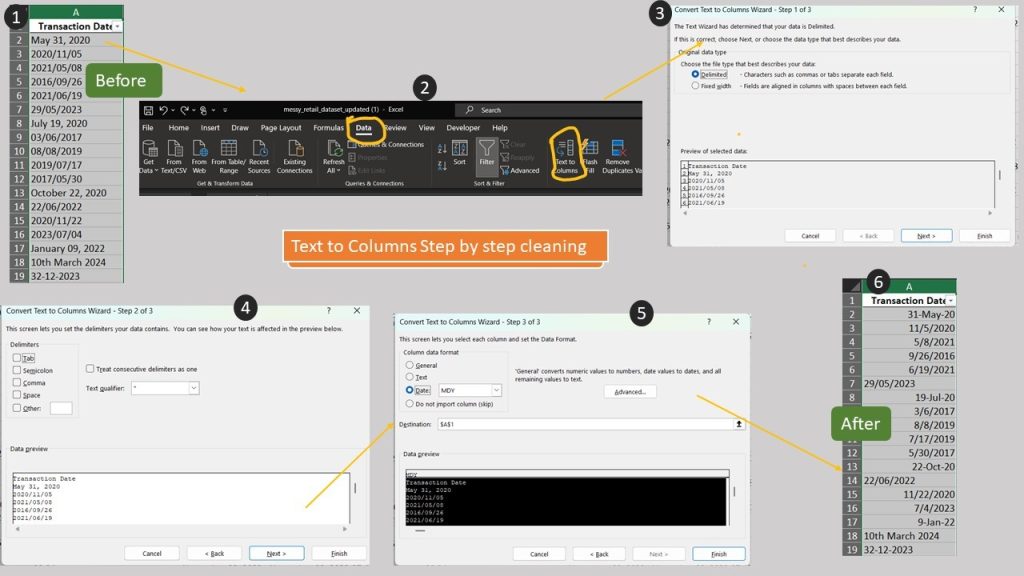
Using the Text to Column tool
Excel converts recognizable text values into valid date values. You’ll notice some cells shift from left-aligned (text) to right-aligned (date), indicating successful conversion.
Step 3: Replace Dashes with Slashes in Data and Time Fields
To prevent regional formatting issues and maintain consistency:
- Select the column.
- Press Ctrl + H to open Find and Replace.
- Replace all ‘-‘ with ‘/ ‘.
- Click Replace All.
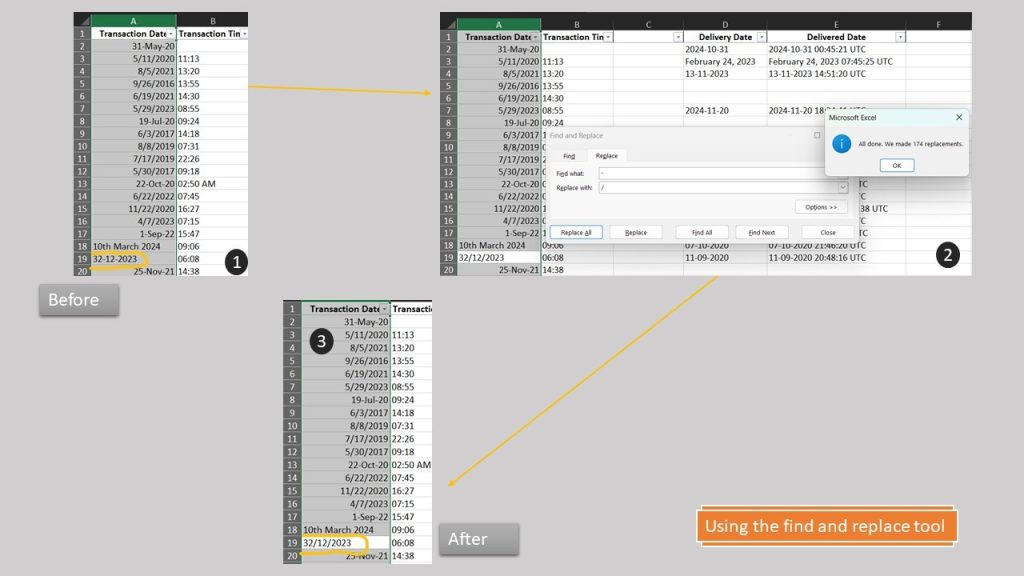
Using the find and replace tool
This ensures Excel uniformly interprets date separators.
Step 4: Use IF Statements to Clean Specific Text-Based Date Values
During date data cleaning in Excel, some date entries are usually not in a standard Excel-recognized format, like in our dataset.
These included human-readable values like “10th March 2024”, relative entries like “Yesterday”, and standalone years such as “2023”. All of these can be cleaned using conditional logic with the IF() function.
Suppose your raw date values are in Column A, and you’re working in a helper column (Column B). Here are three common cases and how to handle them:
1. Text-Based Dates with Suffixes (e.g., “10th March 2024”)
Formula: =IF(A2="10th March 2024", DATE(2024,3,10), A2) 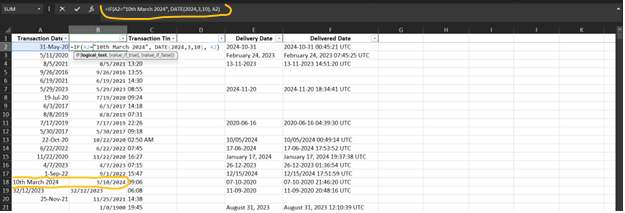
What It Does:
- Checks if the value is exactly “10th March 2024”.
- Replace it with a clean Excel date: March 10, 2024.
- If the condition is not met, the original value from A2 is returned.
2. Relative Dates (e.g., “Yesterday”)
Formula: =IF(A2="Yesterday", DATE(2025,3,23), A2) 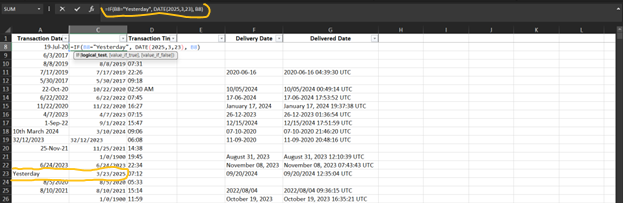
What It Does:
- Converts “Yesterday” into a specific, fixed date for consistency.
- You may also use TODAY()-1 for dynamic values in live data environments.
3. Year-Only Entries (e.g., “2023”)
Formula: =IF(A2=2023, DATE(2023,1,1), A2) 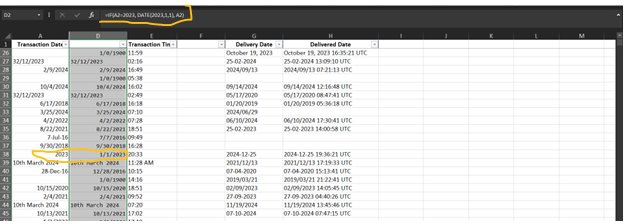
What It Does:
- Fills in missing day and month data by assuming January 1st of the given year.
Tip: Always verify how many rows each pattern affects before using static replacements. For dynamic solutions, replace hard-coded dates with formulas like TODAY() or use lookup tables for more flexibility.
Step 5: Reversing Corrupted or Inverted Strings
When performing date data cleaning in Excel, cases like 2202, 40 rebmetpeS, or 41/60/0202: often happens. Let’s handle it with the function
Formula:
=TEXTJOIN("", TRUE, MID(A2, SEQUENCE(LEN(A2),1,LEN(A2),-1), 1)) 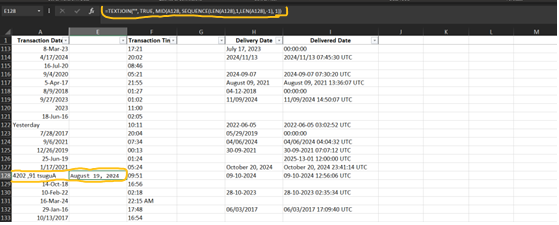
Explanation:
- SEQUENCE() generates reversed positions.
- MID() extracts characters in reverse order.
- TEXTJOIN() rebuilds the reversed string for further processing.
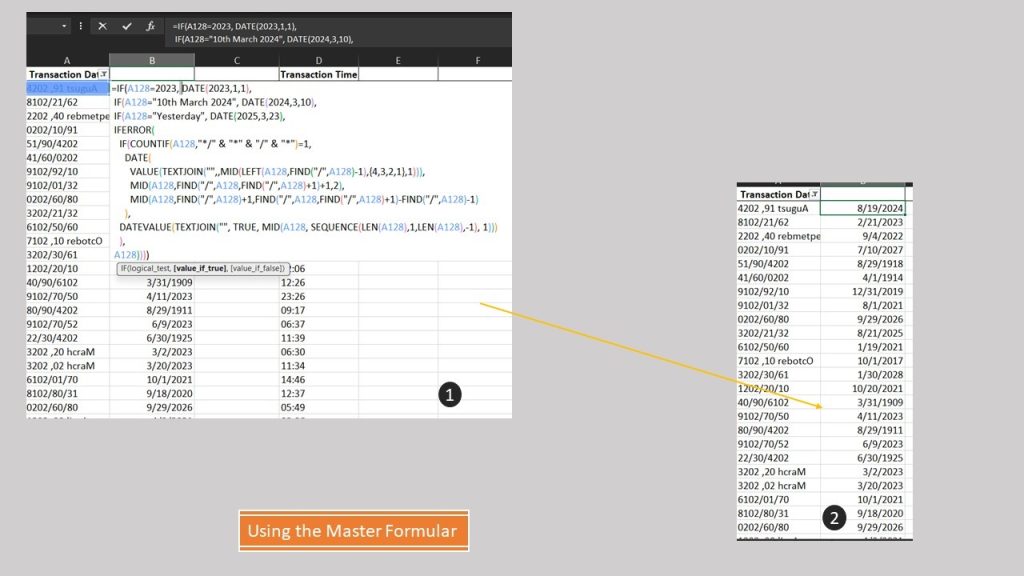
Step 6: Apply a Master Formula to Automate the Date Data Cleaning in Excel
To combine all conditions and clean your column in one go:
=IF(A2=2023, DATE(2023,1,1),
IF(A2="10th March 2024", DATE(2024,3,10),
IF(A2="Yesterday", DATE(2025,3,23),
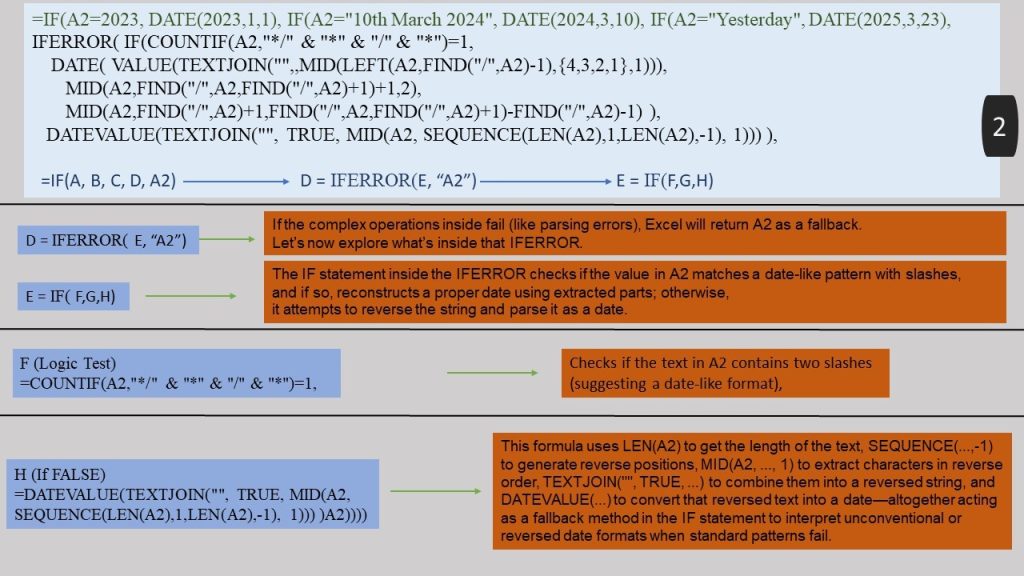
IFERROR(
IF(COUNTIF(A2,"*/" & "*" & "/" & "*")=1,
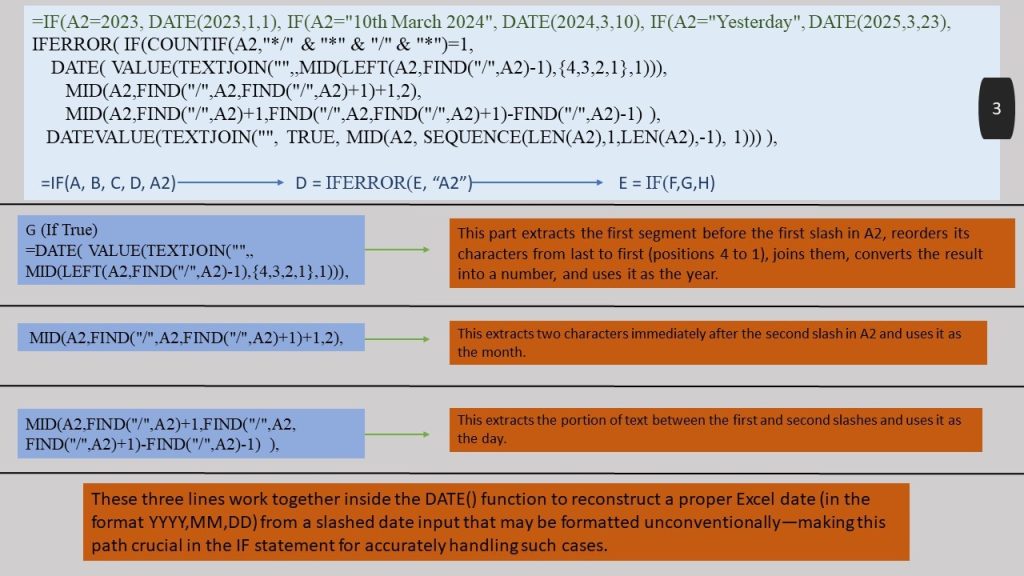
DATE(
VALUE(TEXTJOIN("",,MID(LEFT(A2,FIND("/",A2)-1),{4,3,2,1},1))),
MID(A2,FIND("/",A2,FIND("/",A2)+1)+1,2),
MID(A2,FIND("/",A2)+1,FIND("/",A2,FIND("/",A2)+1)-FIND("/",A2)-1)
),
DATEVALUE(TEXTJOIN("", TRUE, MID(A2, SEQUENCE(LEN(A2),1,LEN(A2),-1), 1)))
),
A2))))
Explanation:
| Condition | Purpose |
| IF(A2=2023, DATE(2023,1,1) | Converts year-only value to a complete date |
| IF(A2=”10th March 2024″ | Converts exact-text date to a valid format |
| IF(A2=”Yesterday” | Replaces relative term with a specific date |
| IFERROR(…) | Catches any failed conversions |
| COUNTIF(…, “*/” & “*” & “/” & “*”) | Detects slashed date formats to process |
| TEXTJOIN(…) + MID(…) | Reverses invalid strings like 41/60/0202 |
| Final A2 | Returns original if no condition is matched |
Step 7: Clean and Standardize Transaction Time Values The Transaction Time column contained a mix of time formats, including 12-hour and 24-hour representations, notice that some entries lacked the proper AM/PM designation, This made it difficult to perform time-based calculations or merge the column with other datetime fields.
To resolve this, we used two different formulas to handle:
- 24-hour and mixed-format time entries
- General time standardization
Suppose the raw time data is in Column A, and you’re writing the cleaned results in Column B.
➡️ Cleaning Mixed Time Formats and Handling 24-Hour Values
Formula:
=IFERROR(
  IF(VALUE(LEFT(A2,FIND(":",A2)-1))>12,
     TEXT(TIMEVALUE(SUBSTITUTE(A2," AM","")), "hh:mm:ss"),
     TEXT(TIMEVALUE(A2), "hh:mm:ss")
  ),
"") 
What This Does:
- LEFT(A2,FIND(“:”,A2)-1) extracts the hour portion of the time.
- VALUE(…)>12 checks if the hour is in 24-hour format (e.g., 14:30).
- If true, it removes ” AM” (if mistakenly present), and converts the time using TIMEVALUE(), then reformats it using TEXT(…, “hh:mm:ss”).
- If false, it assumes the time is in proper 12-hour format and processes it normally.
- The outer IFERROR() handles any invalid or blank cells by returning an empty string instead of an error.
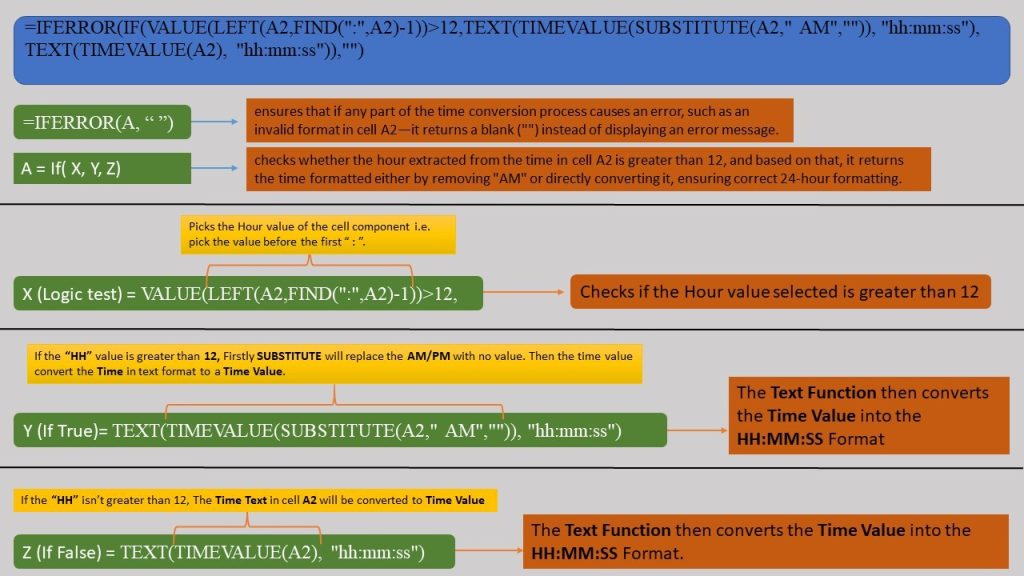
This formula ensures that all values are converted to a clean, standardized 24-hour format.
➡️ Standardizing Time Format and Handling Simple Entries
Formula: =IFERROR(TIMEVALUE(T2), “”)

What This Does:
- Attempts to convert the value in T2 to a valid Excel time.
- If successful, Excel stores the time as a serial number (e.g., 0.5 for 12:00 PM).
- If unsuccessful (e.g., blank or invalid input), it returns an empty string.
This is useful as a final pass to ensure all cleaned time values are stored in a consistent and Excel-recognized format.
Step 8: Clean Combined Date-Time Values with UTC Tags
In some datasets, both the date and time are stored in the same cell—often exported from systems that include metadata such as “UTC” for time zones. In this case, column H contained values like:
February 24, 2023 07:45:25 UTC
2024-10-31 00:45:21 UTC
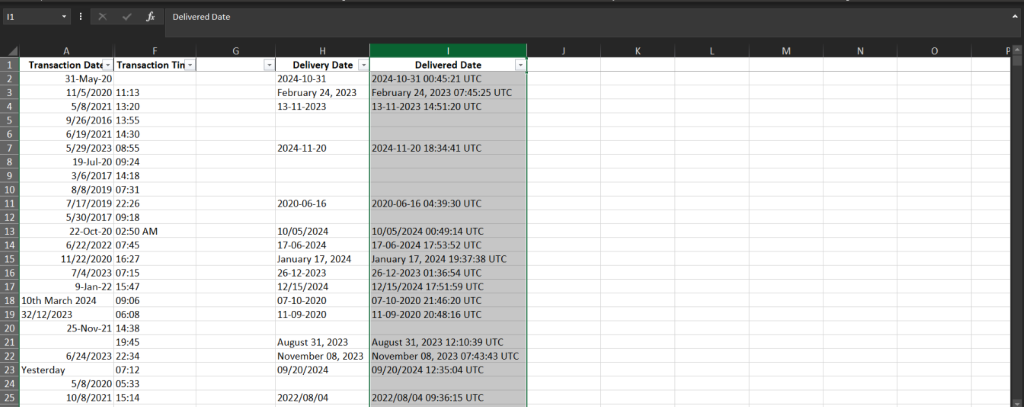
Messy Date-Time Column
These entries are not recognized as valid date/time values in Excel until cleaned and properly parsed.
1️⃣ Remove the “UTC” Tag
The first step is to remove “UTC” from the end of each string to avoid parsing issues.
Formula: =SUBSTITUTE(H2, “UTC”, “”)
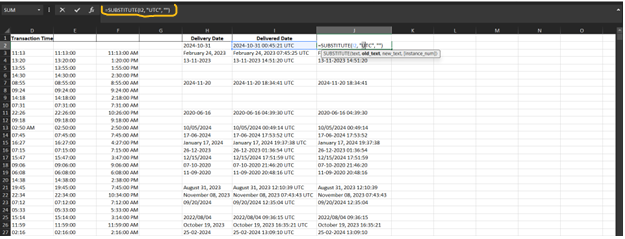
Explanation:
- This removes the substring “UTC” from each entry, leaving a space between the date and time.
- You can apply this formula in a helper column (e.g., Column I) and drag down to apply it across all rows.
2️⃣ Convert to a Recognized Date-Time Format
Once “UTC” has been removed, the values can be recognized by Excel as combined date-time values. If Excel still doesn’t interpret them correctly, proceed to split the column manually.
3️⃣ Split Date and Time Using Text to Columns
To separate the date and time into their respective columns:
- Select the cleaned helper column.
- Go to the Data tab and click Text to Columns.
- Choose Delimited, then click Next
- Select Space as the delimiter.
- Click Finish.
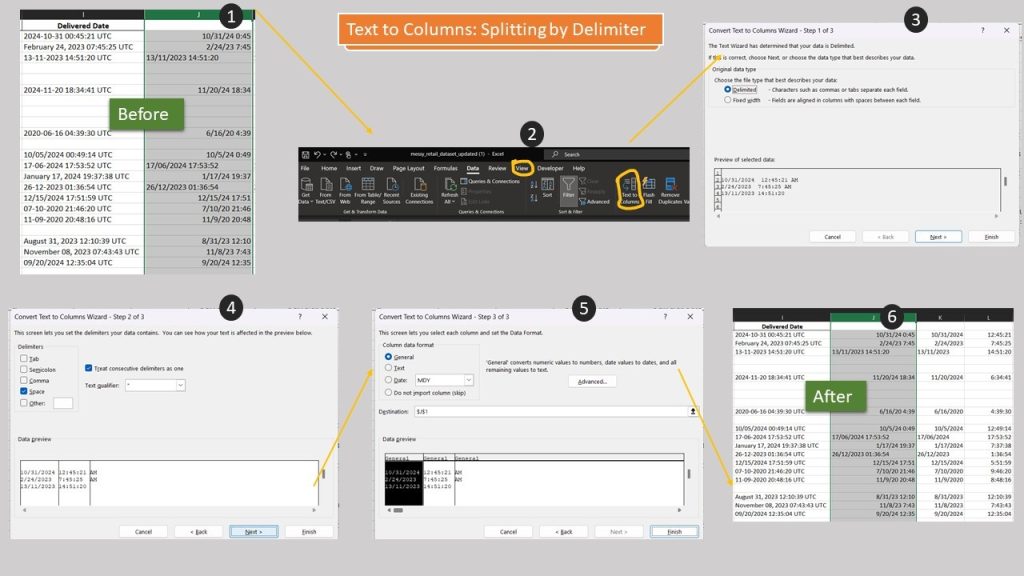
Using Text to columns to split by Delimiters
This will split the content into columns:
- The first column now contains only the date.
- The second column contains only the time.
4️⃣ Standardize the New Date and Time Columns
For the Date Column
- If Excel still treats the date as text (left-aligned), use Text to Columns again with Date → MDY selected.
For the Time Column
- Select the column and right-click → Format Cells.
- Choose a standard Time format like hh:mm:ss or 13:30:55 to ensure consistency.
This step guarantees that both date and time values are now independently recognized by Excel and ready for calculation or reporting.
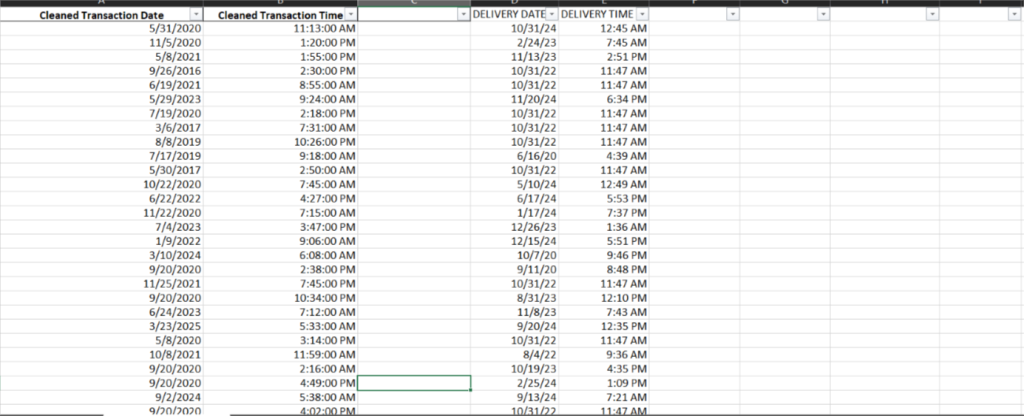
Cleaned Date and Time Columns
Best Practices for Cleaning Date and Time Data in Excel
Cleaning date and time data can seem straightforward, but maintaining consistency and accuracy at scale requires a strategic approach. Here are key best practices to follow:
1. Always Back Up Your Data First
Before making any changes, duplicate the original worksheet. This protects your data from unintended edits or formula errors.
2. Apply Filters Early
Use filters to understand the range of formatting issues. This makes it easier to identify patterns and plan your cleaning approach.
3. Standardize Formats as Early as Possible
Convert all entries to consistent date (MM/DD/YYYY) and time (HH:MM:SS) formats before attempting analysis or combining columns.
4. Use Helper Columns for Transformation
Rather than overwriting original data, use helper columns to test formulas and transformations. This preserves the raw values and allows for easier debugging.
5. Leverage Excel Tools Before Complex Formulas
Start with built-in tools like Text to Columns, Find and Replace, and Format Cells before writing complex nested formulas. These often solve simpler formatting issues faster.
6. Document Your Process
If the dataset will be reused or shared, comment on your formulas or create a short guide. This adds transparency and makes the process reproducible by others.
Common Pitfalls to Avoid
Even experienced Excel users can run into problems when cleaning messy date and time values. Here are common mistakes to watch for:
1. Not Accounting for Regional Date Settings
Excel may interpret 02/03/2024 as February 3 or March 2, depending on your locale. Always set or convert to a known standard like MM/DD/YYYY.
2. Forgetting to Check for Text-Formatted Dates
Some cells may look like dates but are actually text. Use ISNUMBER() or check alignment (left vs. right) to confirm whether Excel recognizes them as valid date/time values.
3. Overwriting Source Data Without Testing
Avoid making direct edits to original columns without verifying the output. Helper columns are a safer way to apply and test logic.
4. Ignoring Blank or Null Values
Formulas like DATEVALUE() or TIMEVALUE() can throw errors if blank cells aren’t accounted for. Wrap logic in IFERROR() or check for blanks first.
5. Using Complex Formulas Too Early
It’s tempting to jump into nested IF() statements or text manipulation right away. Start with visual exploration and basic cleanup before applying layered logic.
Conclusion and Next Steps in Date Data Cleaning in Excel
Cleaning date and time fields is one of the most essential—and often overlooked—steps in preparing data for analysis.
Whether you’re working on a simple Excel report or preparing data for a dashboard, accurate time formatting ensures clarity, consistency, and trust in your insights.
In this guide, we covered:
- How to identify and assess formatting issues
- Step-by-step cleaning using tools like Text to Columns, SUBSTITUTE, and conditional logic
- Methods for standardizing 12-hour and 24-hour time formats
- Strategies for parsing complex date-time strings
- The use of a consolidated master formula to automate cleanup
Next Steps:
- Apply this approach to your own datasets.
- Create a reusable formula library for recurring date/time cleanup needs.
- Explore Power Query in Excel for more scalable transformations.
- Share this guide with team members or clients who work with inconsistent data.
By following these steps, you’ll not only save time but also improve the reliability of your analysis and decision-making process.
To learn more about the Excel functions that were used in this guide as well as other powerful Excel functions, visit Microsoft’s official Excel function documentation.